In challenging applications like heavy equipment used in mining, construction and manufacturing, it’s important to prevent galling, which is a tendency of different materials to stick together under relative motion at loading. Galling can result in adhesive wear and seizing of two materials together. While this can be beneficial if you’re trying to friction stir weld two materials together, it is detrimental when you’re trying to design a bearing in which the two surfaces must slide together with low friction. Our team measured the galling resistance of our ToughMet 2 copper-nickel-tin alloy and two other copper alloys against 4140 steel. ToughMet 2 alloy had the greatest deformation resistance of the three non-galling alloys. Read on for the testing details.
The galling resistance and galling threshold stress of three copper-based alloys was measured against 4140 steel tempered to HRC 35. These tests were conducted to provide information on the relative value of ToughMet 2 alloy in galling applications such as wear plates and bushings. The copper alloys chosen for comparative tests, C95400 and C95900, are alloys commonly used in these applications.
The test method employed for the measurement, ASTM G98, provides a threshold value below which galling will not occur. Many wear plate designs incorporate lubrication such as graphite or graphite plugs. Ultimately, the failure mechanism of these plates, or bushings, is adhesive wear of the copper alloy, which arises from the breakdown and wiping of the lubrication from the wear tracks. The test method used for these galling measurements simulates the adhesive wear situation and establishes the maximum working load of the alloy in service conditions.
Material
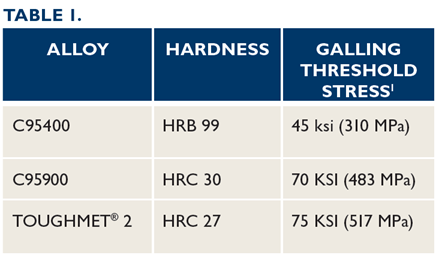
The galling tests were conducted using C95900, C95400 and ToughMet 2 alloy. The C95400 was obtained from Thyssen, and the C95900 and ToughMet 2 material from Materion. Tensile properties of the alloys were not available. Hardness values, measured in R&D, are listed in Table 1. The mating block test material was 4140 tempered to HRC 35. The wear surfaces were manually polished to Ra 12 to 16 μ in (0.3 to 0.4 μm) after machining. The surfaces of both the copper alloys and the steel blocks were tested in the as polished condition.
Test Procedure
The galling resistance measurements were conducted at Herron Testing Laboratories, Inc. The specimen preparation and testing procedures conformed to ASTM G98-911. This test method has been used to characterize other copper, ferrous and nonferrous alloys by Materion R&D.2,3 In all tests, the block was 4140 steel with one of the copper alloys as the button without lubrication. Stress was applied using an Instron Mechanical Testing Unit beginning with increments of 10 ksi (69 MPa). Visual examination of the copper buttons was performed to determine if a button had galled or deformed. Galling resistance is reported as the lowest stress at which neither galling or button deformation was observed.
Galling of the copper alloys to the 4140 steel was not observed in the tests prior to deformation of the buttons. The failure criterion for the tests, therefore, was not galling but the stress at which deformation was observed. These results are listed in Table 1.
Based on the button deformation stress, ToughMet 2 alloy withstood the highest applied load prior to failure. The C95900 closely trailed the ToughMet 2 alloy, whereas, the C95400 showed about 30 ksi lower deformation stress. These results accompany the material hardness, lower galling stress with lower hardness. This trend was reported in Reference 3 for other copper alloys where the galling (deformation) stress was measured as approximately 80% of the 0.2% yield strength. Using this relationship, the calculated yield stress of the current test alloys would be, 56 ksi, 88 ksi and 94 ksi for C95400, C95900 and ToughMet 2 alloy, respectively. The calculated yield strength for ToughMet 2 alloy is in the expected range for the reported hardness, HRC 27.
1. The copper alloys tested did not gall prior to deforming.
2. The failure of the test specimens as defined as deformation and appears to approximate 80% of the copper alloy yield strength.
3. The highest deformation resistance was measured for ToughMet 2 alloy followed closely by C95900 having a similar hardness. The lowest deformation resistance was observed for C95400.

Galling (metal transfer) was not observed on any of the alloys tested against 4140. The galling threshold is therefore defined as the stress at which deformation of the copper alloy was observed.
Thanks for joining me for another edition of In Our Element. For ongoing industry updates, connect with me on LinkedIn.