Some of the most important properties to know about a material are its yield strength, tensile strength, elastic modulus, elongation, resilience and toughness. All these values can be found using tensile testing. The uniaxial tensile test is an invaluable tool for material characterization and verification – however, the test must be done properly to ensure the results are valid. In this article we discuss the options and pitfalls with selecting the best samples to use in your tensile testing.
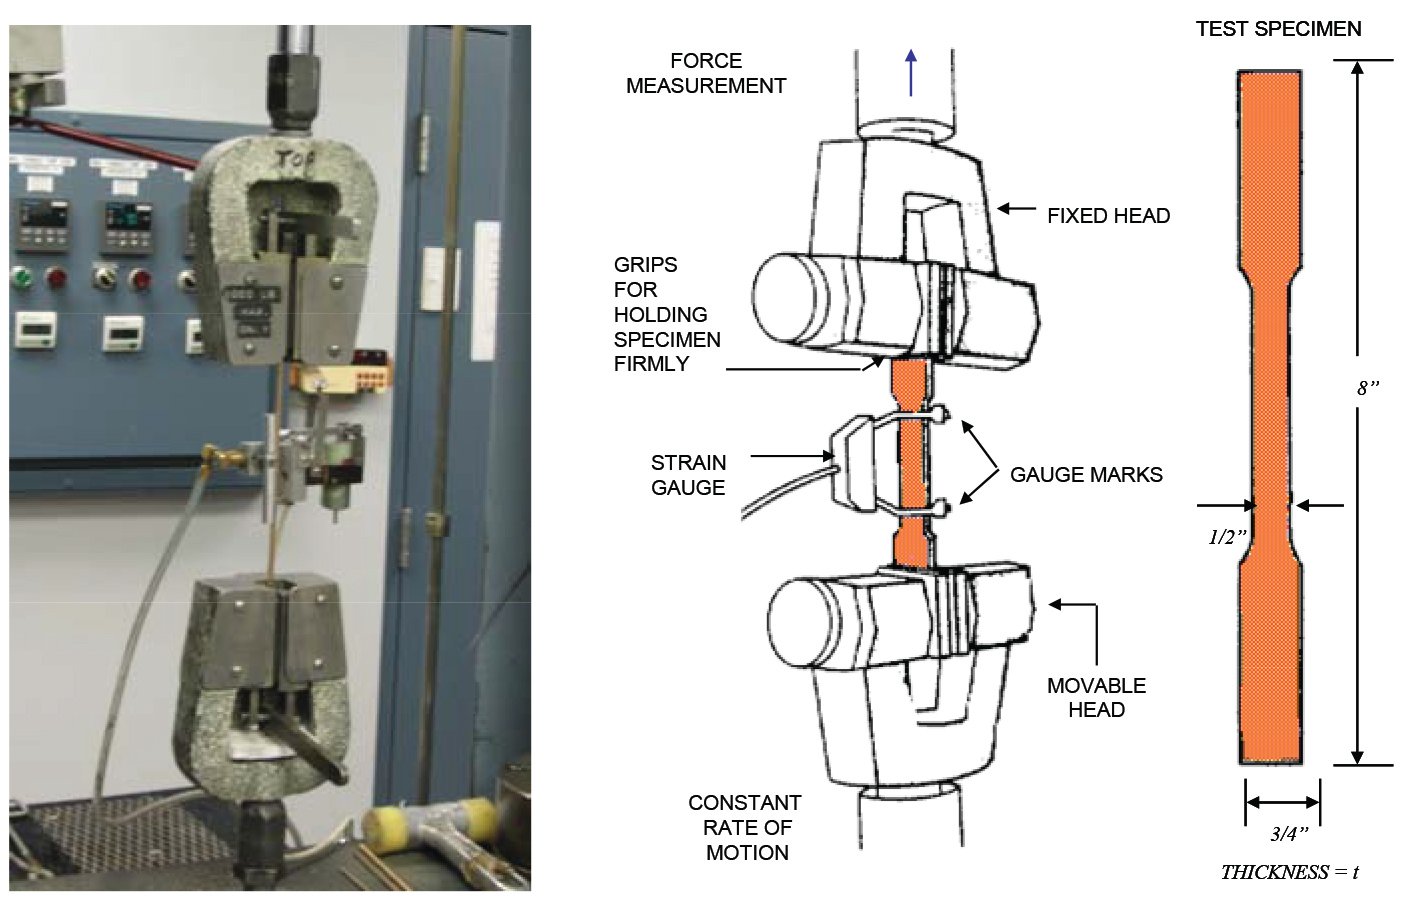
Figure 1 below illustrates how a sample is tested in a standard tensile test. According to ASTM E8, the optimum shape for testing strip materials is called a “dogbone” due to it being wider at the ends and narrow in the middle. The dimensions of the sample are determined by the ASTM specification for that material.

Figure 1. Standard Tensile Test Configuration
To perform the test, the grips of the testing apparatus hold the specimen firmly at the wide ends. Because the middle of the sample is narrower than the ends, the stress is concentrated in that area so that fracture and most of the strain occur there. Strain is measured in this section, and stress is calculated from the force load on the grips. If any strain or deformation occurs outside of the test area, the test results will be inaccurate.
Because it takes time to machine a dogbone-style tensile sample, straight-sided samples are also permitted by ASTM. However, if the fracture occurs outside of the area in which the strain is measured, the test results must be thrown out. If using straight-sided pieces, it is a good idea to prepare multiple samples in case this happens.
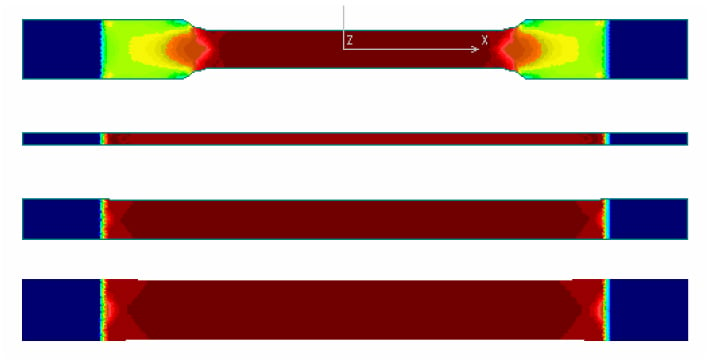
Figure 2 shows a finite element analysis model of tensile samples of identical thickness and length, with varying widths, subjected to the same elongation. Note that in the dogbone sample, the stress is concentrated in the test area, while the stress is evenly distributed in the straight-sided sample. The stress magnitudes are approximately the same in all the samples.

Figure 2. Finite Element Model of Stress Distribution in Tensile Test Samples
The size of the tensile sample is just as important as the shape in determining the results. Narrow strip with a width-to-thickness ratio of less than 8:1 will show lower stress (and therefore lower strength) than wider material. Also, samples of small cross section will show a small change in force for a given elongation. This decreases the accuracy of the force measurement, which in turn reduces the accuracy of the stress measurement.
For samples with round cross sections, an additional problem may arise if the material to be tested is slightly curved. If the test piece is not aligned perfectly straight between the grips, there will be bending stress added to the tensile stress. This additional stress will not be taken into consideration when calculating the stress from the force load.
If the material to be tested is plated, there is potential for inaccuracy as well. A soft, lubricious plating like tin may cause the grips to slip during the test, impacting the strain and stress readings. Tightening the grips may compensate for any slippage, although this will increase the stress in that area. Any additional stress outside of the test section increases the likelihood of fracture occurring outside of the gauge length.
In strip material, any nicks or burrs along the edge of the test piece will concentrate stress, which can cause the sample to yield and fracture prematurely. It is recommended to smooth the edges of the sample with a piece of sandpaper or an emery board before testing, especially if using a straight-edged sample slit from a wider strip. In rod and wire samples, a smooth surface finish after machining is imperative.
The results of the test depend on the rate at which the sample is elongated or strained. This strain rate sensitivity shows up as higher stress at fast strain rates, and lower stress at slow strain rates. Therefore, two samples of the same piece of material that are tested on the same machine will show different strengths if they are tested at different rates.
For the sake of consistency, it is best to run tests at the same strain rate on all the materials that you want to compare. However, tensile tests on high elongation materials will take longer than low elongation materials.
Given all this potential variation, it becomes critical to ensure parallel comparisons of materials. It is best to use properly prepared, unplated tensile test specimens of identical size and shape, tested at the same strain rate to ensure a more accurate test and comparable results.
Learn more about material strain testing, see our related blogs: